One of the very first Physiology practical sessions in medical school involves learning how blood pressure is measured in the clinic. Understanding how to take blood pressure step by step should ideally be a prerequisite before entering the clinical classes in medical school.
This is because in the clinical rotations in medical school, you will be clerking patients and this involves history taking and physical examination. And physical examination involves taking the vital signs of patients. And the vital signs include;
- The Blood pressure
- Temperature
- Respiratory rate
- Oxygen saturation
- Pulse rate
This post is specifically meant for medical students and students in other paramedical courses who are currently trying to understand how blood pressure is measured. And in this post, we will be discussing the following;
- What is Blood Pressure and the theory behind it?
- Instruments for taking Blood Pressure and their parts
- How to take blood pressure step by step in the clinic
- How to measure blood pressure with a sphygmomanometer (Mercury type)
- How to measure blood pressure with a sphygmomanometer (Aneroid type)
- How blood pressured is measured using the digital sphygmomanometer
- Auscultatory method of measuring blood pressure
- Palpation method of measuring blood pressure
- What do blood pressure numbers mean?
- Blood pressure good range and bad range
- Blood pressure in children
- Blood pressure for pregnant women
- Some frequently asked questions about blood pressure
Table of Contents
- What is Blood Pressure and the theory behind it?
- How Blood Pressure Is Measured In The Clinic Step By Step
-
How Blood Pressure Is Measured Using A Mercury sphygmomanometer
- Step 1: Allow The Patient To Rest For 5 Minutes
- Step 2: Arm Of The Patient Must Be At The Level Of The Heart
- Step 3: Confirm that the cuff is adequate for the patient’s size
- Step 4: Tie the Cuff Round The Patient’s Arm
- Step 5: The Palpation Method of Measuring Blood Pressure
- Step 6: The Auscultatory Method Of Measuring Blood Pressure
- Step 7: Interpretation Of The Results: What Do Blood Pressure Numbers Mean?
- How Blood Pressure Is Measured Using An Aneroid sphygmomanometer
- How blood pressure is measured using the digital sphygmomanometer
-
How Blood Pressure Is Measured Using A Mercury sphygmomanometer
- Summary
What is Blood Pressure and the theory behind it?
Every now and then, the heart pumps blood into the lungs for oxygenation which returns to the left ventricle of the heart where the oxygenated blood is pumped to all parts of the body.
The blood reaches the various parts of the body through the blood vessels (arteries). And as the blood is circulating through the arteries after each heartbeat, it exerts some pressure on the walls of the arteries.
This pressure exerted on the walls of large arteries by the circulating blood is called the blood pressure, and it is dependent on the volume of circulating blood, the force with which the heart contracts, and the resistance which the blood vessels offer against the blood.
The maximum pressure exerted on the walls of the arteries during one heartbeat is called the systolic pressure, while the minimum pressure exerted on the walls of the arteries in one heartbeat is the diastolic pressure.
Instruments for taking Blood Pressure and their parts
The Instruments for measuring blood pressure include;
- A stethoscope
- A sphygmomanometer (Aneroid, mercury, digital, or ambulatory blood pressure monitor)
- A timer or a stopwatch
Parts Of A Stethoscope And Functions
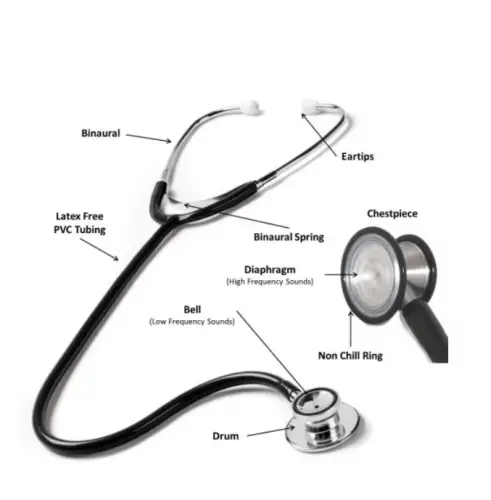
- Ear Plugs: Also known as ear tips. It is the part of the stethoscope which is placed on the examiner’s ear.
- Diaphragm: This is the wider part of the other end of the stethoscope. It is ideally used for checking blood pressure, detecting breathing as well as normal heart rhythms.
- The Bell: It is the smaller side of the other end of a stethoscope and is ideal for detecting abnormal heart sounds (murmurs), bruits, and bowel sounds.
- The other parts of the stethoscope such as the rubber and metallic tubing, binaural spring, and drum only play roles of sound conduction.
Parts Of A Mercury Sphygmomanometer And Functions
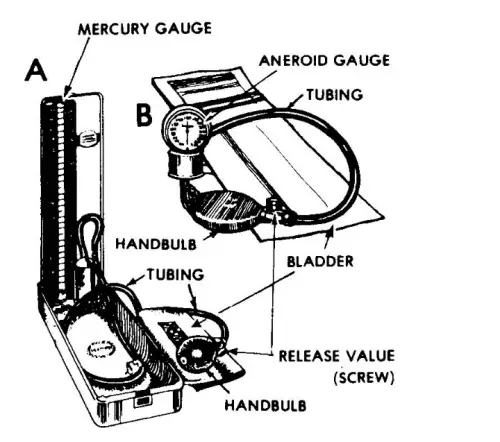
- Mercury Gauge: Use to take blood pressure readings
- Hand Bulb: Used in inflating the cuff of the stethoscope
- Tubing: Serves as a conductor for the air
- Release Valve (Screw): Used in controlling the mercury gauge
- Mercury Bulb: Used in locking and unlocking the mercury
Parts Of An Aneroid Sphygmomanometer
The aneroid sphygmomanometer is similar to the mercury type, but the only difference is that the mercury gauge seen in the mercury sphygmomanometer is replaced by the aneroid manometer gauge.
The Digital Sphygmomanometer

The digital sphygmomanometer has a simplistic design. It has no hand bulb release valve or screw, the function of the screw and the hand bulb is coordinated by the Digital Automatic Blood Pressure Monitor.
Aneroid Sphygmomanometer For Sale Near MeHow Blood Pressure Is Measured In The Clinic Step By Step
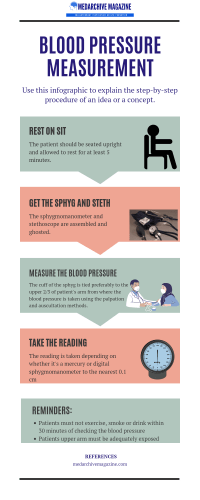
Below is a step-by-step guide on how to take the blood pressure of a patient in a clinic with infographics for better illustration.
How Blood Pressure Is Measured Using A Mercury sphygmomanometer
Step 1: Allow The Patient To Rest For 5 Minutes

- The first step in taking blood pressure is to ensure that the patient is rested, reassured, and possibly relaxed for about 5 minutes. This will help to reduce the chances of having a falsely high value induced by the hospital setting (white coat hypertension).
Step 2: Arm Of The Patient Must Be At The Level Of The Heart

- The next step is to position the patient’s arm at the same level as the patient’s heart. This can be easily achieved in clinics by allowing the patient to sit upright facing you directly, with the patient’s forearm on a table in a supine position, and the sphygmomanometer placed just adjacent to the patient’s forearm.
Step 3: Confirm that the cuff is adequate for the patient’s size

- The next step before you start taking the measurement is to ensure that the cuff of the sphygmomanometer is adequate for the patient’s size. An adequate cuff must cover 2/3rd of the patient’s arm. There are adult cuffs and pediatric cuffs used in measuring blood pressure for children.
Step 4: Tie the Cuff Round The Patient’s Arm

- The cuff can now be tied on the patient’s arm at 2cm above the cubital fossa. To ensure that the cuff is tied adequately;
- Make sure that the cuff is not too tight or too loose.
- There is usually an arrow on the inner lining of the cuff. This arrow should be aligned in the same position as the brachial artery.
- Tuck in the free end of the cuff gently into the space between the arm and the first few rows of the cuff.
Step 5: The Palpation Method of Measuring Blood Pressure

- The next step is to use the palpation method of checking blood pressure to get the systolic blood pressure.
- Slowly inflate the cuff of the sphygmomanometer using the bladder using one hand, and use the other hand to palpate for the radial pulse. Keep inflating the bladder till the radial pulse disappears, and immediately take your reading from the mercury gauge of the sphygmomanometer. This value you get corresponds to the systolic blood pressure.
Note: You can as well use this time to check the pulse rate using the stopwatch.
Step 6: The Auscultatory Method Of Measuring Blood Pressure

- The next step is to determine the diastolic blood pressure using the auscultation method of checking blood pressure.
- Inflate the cuff again up to the systolic pressure you got from the palpation method. Then place the diaphragm of your stethoscope on the medial aspect of the patient’s lower arm just over the brachial artery, and put the ear tips of the stethoscope on your ears.
- This application of the stethoscope should be in such a way as to ensure good contact with the skin without exerting too much pressure that will obliterate the arterial pulsation.
- Then slowly deflate the cuff using the screw at the rate of 2mmHg per second. Then listen till the last Korotfoff’s sounds disappear. The reading you get is the diastolic blood pressure.
Step 7: Interpretation Of The Results: What Do Blood Pressure Numbers Mean?

The last step is to interpret your findings by comparing them with the blood pressure good range to know where to classify your patient.
| Type | Blood Pressure Range | Interpretation |
| Systolic | 100 – 120 mmHg | Normal (Blood pressure good range) |
| Diastolic | 60 – 80 mmHg | Normal (Blood pressure good range) |
| Systolic | 120 – 139 mmHg | Prehypertension |
| Diastolic | 80 – 89 mmHg | Prehypertension (Blood Pressure Diastolic High) |
| Systolic | > 139 mmHg | Hypertension |
| Diastolic | > 89mmHg | Hypertension (Blood Pressure Diastolic High) |
| Systolic | < 90mmHg | Hypotension |
| Diastolic | < 60mmHg | Hypotension |
How Blood Pressure Is Measured Using An Aneroid sphygmomanometer
Measurement of blood pressure using the mercury sphygmomanometer is pretty much similar to how blood pressure is measured using the aneroid sphygmomanometer.
The only difference is that this time, the aneroid barometer gauge is placed over the cuff on the forearm using the hook behind it. And the reading is taken off the aneroid gauge.
How blood pressure is measured using the digital sphygmomanometer
A similar technique is also deployed while using a digital sphygmomanometer. But this time, steps 5 and 6 are omitted as the digital blood pressure monitor will take care of this.

Summary
Blood pressure measurement is a crucial component of physical examination which you must learn as a medical student before entering the clinical classes in medical school.
How do we measure blood pressure? The steps below are the summary of how blood pressure is measured in the clinic and in hospitals;
Other Posts You May Like


